Changing a kitchen sink faucet might seem hard, but it’s not. With some simple steps, you can do it yourself.
Replacing a kitchen sink faucet can save you time and money. You don’t need to call a plumber for this task. Whether your faucet leaks or you just want a new look, this guide will help. By following these instructions, you will have a new faucet installed in no time.
This project requires essential tools and some patience. In this blog post, we will walk you through the process step-by-step. Ready to give your kitchen a fresh update? Let’s get started on changing that faucet.
Tools And Materials Needed
Changing a kitchen sink faucet is a rewarding DIY project. Before you start, gather the right tools and materials. This ensures a smooth and hassle-free installation process. Below are the essentials you need.
Essential Tools
Having the right tools makes the job easier. Here are the must-have tools:
- Adjustable wrench: Useful for tightening and loosening nuts and bolts.
- Basin wrench: Helps reach tight spaces under the sink.
- Screwdriver: Both flathead and Phillips are needed.
- Plumber’s tape: Prevents leaks at threaded joints.
- Bucket: Catches any water that might spill.
- Flashlight: Provides light in dark or dim areas under the sink.
Required Materials
Gathering the right materials is crucial for a successful faucet change. Here’s what you need:
- New kitchen faucet: Choose one that fits your sink.
- Supply lines: New ones ensure a leak-free connection.
- Plumber’s putty: Seals gaps to prevent leaks.
- Rags or towels: Clean up any spills or drips.

Credit: www.homedepot.com
Preparing The Workspace
Changing a kitchen sink faucet might seem daunting. But with the right preparation, it becomes a manageable task. The first step is preparing the workspace. This ensures a smooth and efficient faucet replacement.
Clearing The Area
Start by clearing out items under the sink. Remove cleaning supplies, bins, and anything else stored there. This gives you enough space to work. It also prevents damage to items from water leaks or tools.
Next, place a small bucket or pan under the pipes. This catches any water that might drip during the process. Lay down a towel or sheet to protect the floor from spills and falling tools. Having a clear, organized space makes the task easier.
Turning Off The Water Supply
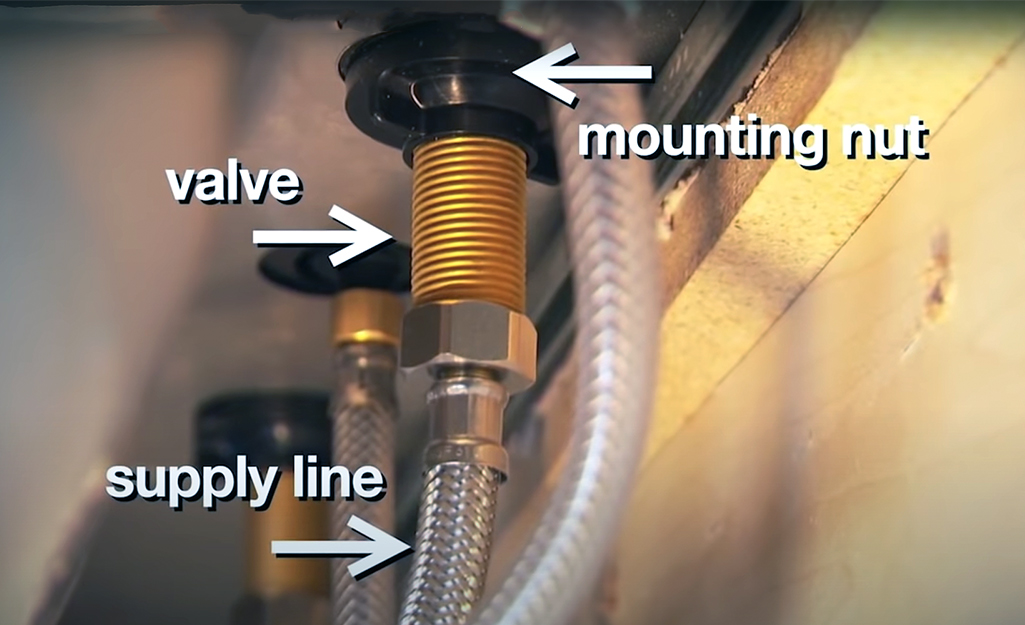
Find the water shut-off valves under the sink. Typically, they are located at the back wall. Turn both the hot and cold water valves clockwise. This shuts off the water supply to the faucet.
After turning off the valves, open the faucet to release any remaining water. This step ensures no water flows when you disconnect the faucet. Verify the water is off by checking for drips. If any, tighten the valves more or check for another valve.
Now, the workspace is ready for the next steps. You’ve created a safe, organized environment to change your kitchen sink faucet.
Removing The Old Faucet
Removing the old faucet is the first step in installing a new one. This process involves loosening connections and detaching the faucet from the sink. Follow these steps to make sure the removal goes smoothly.

Loosening The Connections
Start by turning off the water supply. Locate the shut-off valves under the sink and turn them clockwise. Use a wrench to loosen the nuts connecting the water lines to the faucet. Be careful not to damage the pipes. Have a bucket ready to catch any water that may spill.
Detaching The Faucet
Once the water lines are loose, look for the mounting nuts. These hold the faucet in place. Use a basin wrench to reach and loosen these nuts. This tool is designed for tight spaces. After removing the nuts, lift the faucet out of the sink. Clean the area where the old faucet was attached.
Cleaning The Sink Surface
Before installing a new kitchen faucet, it is vital to clean the sink surface. This ensures a smooth installation. A clean surface helps create a better seal. Follow these steps for a spotless sink.

Scrubbing Away Residue
First, remove any old grime or mineral deposits. Use a mild cleaner. A mix of warm water and dish soap works well. Apply the cleaner with a soft cloth. Avoid abrasive pads to prevent scratches.
Scrub in circular motions. Pay extra attention to the faucet area. This is where most residue collects. Rinse with warm water to remove any soap suds.
Drying The Area
Once the sink is clean, dry it thoroughly. Use a soft, lint-free towel. Ensure no water remains. Moisture can affect the installation process.
Pat dry the entire sink. Focus on the faucet area. A dry surface is essential for the next steps.
Installing The New Faucet
Changing your kitchen sink faucet can refresh the look of your kitchen. This guide helps you with installing the new faucet in simple steps. Follow these easy instructions to ensure a successful installation.

Positioning The Faucet
First, position the new faucet over the sinkholes. Check if the faucet has a gasket or rubber ring. Place it between the sink and the faucet base. This prevents leaks.
Use pa lumber’s putty if your faucet does not have a gasket. Roll a small amount of putty into a snake shape. Place it around the bottom edge of the faucet base.
Now, insert the faucet’s tailpieces into the sinkholes. Make sure the faucet is centred and aligned.
Securing The Connections
Under the sink, use washers and nuts to secure the faucet. Tighten them by hand first. Then,use a wrench for a snug fit. Do not over-tighten.
Next, connect the supply lines to the faucet’s tailpieces. These lines are usually labelled hot and cold. Ensure they match the corresponding valves under the sink.
Use a wrench to tighten the connections. Again, do not over-tighten. This can damage the connections.
Once everything is secure, turn on the water supply. Check for any leaks. If you find leaks, tighten the connections slightly more. Test the faucet by turning it on and off.
Congratulations! You have installed your new kitchen sink faucet.
Connecting The Water Supply Lines
Connecting the water supply lines is crucial in changing a kitchen sink faucet. This part ensures that water flows correctly to your new faucet. Follow these simple steps to attach and tighten the hot and cold water lines.
Attaching Hot And Cold Lines
First, identify the hot and cold water supply lines. The hot water line is usually on the left. The cold water line is on the right. Attach the hot water supply line to the hot water inlet on the faucet. Screw the connector in place by hand. Do the same for the cold water supply line. Ensure each line is securely attached to prevent leaks.
Tightening The Fittings
Use a wrench to tighten the fittings. Turn the wrench clockwise to ensure a snug fit. Do not overtighten, as this can damage the connectors. Tighten until you feel resistance, then give a final gentle turn. Check both fittings to ensure they are equally tight. Turn on the water supply and inspect for any leaks. Tighten further if needed, but be careful not to overtighten.
Testing The New Faucet
Testing is essential after installing your new kitchen sink faucet. This step ensures everything works well and there are no problems. Follow these steps to confirm your new faucet is in perfect condition.
Checking For Leaks
Turn on the water supply under the sink. Slowly open the faucet and let the water flow. Look under the sink and around the faucet base for any signs of water leakage. Tighten any loose connections if you see leaks. Repeat this process until there are no leaks.
Ensuring Proper Flow
Check the water flow from the faucet. Ensure both hot and cold water run smoothly. Switch between hot and cold settings to confirm proper temperature control. If the water flow is weak, check for any blockages. Clean the aerator if necessary. This ensures a steady, strong water stream.
Final Touches
The final touches are crucial to complete your kitchen sink faucet replacement. These steps ensure everything is in place and working perfectly. You’ll feel a sense of accomplishment after a job well done.
Reassembling Under-sink Area
Start by reattaching the water supply lines. Tighten them securely with a wrench. Ensure there are no leaks. Turn on the water supply slowly. Check for any drips or leaks around the connections.
Organize the area under the sink. Place any removed items back in their spots. Make sure nothing is obstructing the pipes or fittings.
Cleaning Up
Wipe down the new faucet with a clean cloth. Remove any fingerprints or smudges. Clean the sink area thoroughly. Make it shine.
Dispose of any old parts or packaging materials. Recycle what you can. Keep your workspace tidy. A clean area makes the kitchen look even better.
Enjoy your new faucet. You’ve done a great job. Your kitchen looks refreshed and functional.
Frequently Asked Questions
What Tools Are Needed To Change A Faucet?
You’ll need a basin wrench, adjustable wrench, plumber’s tape, and a bucket. Having a towel nearby is also helpful.
How Long Does It Take To Change A Faucet?
Changing a kitchen sink faucet typically takes about 1-2 hours. This depends on your experience and the faucet type.
Do I Need To Turn Off The Water?
Yes, turn off the water supply before starting. This prevents any leaks or water damage during the process.
Can I Replace A Faucet Without A Plumber?
Yes, you can replace a faucet without a plumber. Follow step-by-step instructions carefully for a successful installation.
Conclusion
Changing a kitchen sink faucet can be a simple task. Follow the steps, and you can save money. Gather the right tools first. Turn off the water supply. Remove the old faucet. Install the new one. Check for leaks and ensure everything is tight.
With patience, you can do it yourself. Your kitchen will look fresh and new.


