Replacing a kitchen faucet may seem challenging. But with the proper guidance, it’s doable.
A new kitchen faucet can refresh your kitchen’s look and function. Leaky or outdated faucets can cause frustration and wastewater. Knowing how to replace a kitchen faucet can save you money and time. It’s a handy skill for any homeowner.
This guide will walk you through the process step-by-step. With some tools and patience, you can get the job done. Ready to tackle this task? Let’s dive into how you can replace your kitchen faucet quickly and efficiently.
Tools And Materials
Replacing a kitchen faucet might seem daunting. But, with the right tools and materials, it becomes a manageable task. This section will cover everything you need to complete this project efficiently.
Necessary Tools
To replace a kitchen faucet, gather these tools:
- Adjustable wrench
- Basin wrench
- Phillips screwdriver
- Flathead screwdriver
- Plumber’s tape
- Bucket
- Cleaning cloth
Required Materials
Make sure you have these materials ready before you start:
- New kitchen faucet
- Flexible supply lines
- Plumber’s putty or silicone sealant
- New mounting hardware (if not included with the faucet)
Having these tools and materials prepared will make the process smoother. You’ll save time and avoid unnecessary trips to the store.
Preparation Steps
Replacing a kitchen faucet can be a simple DIY project. Proper preparation ensures a smooth process. Follow these steps to get ready.
Turn Off the Water Supply
Before starting, turn off the water supply. Locate the shut-off valves under the sink and turn them clockwise to close them. If there are no local shut-off valves, turn off the main water supply to the house.
Clear The Area
Remove all items under the sink, including cleaning supplies, trash cans, and other stored items. This will provide a clear workspace and prevent damage to your belongings.
Place a bucket or towel under the pipes to catch any water spills. You may also need a flashlight to see better in tight spaces.

Remove Old Faucet
Replacing a kitchen faucet starts with removing the old one. This step is crucial for the smooth installation of your new faucet. Follow these simple instructions to remove your old faucet without a hitch.
Disconnect Water Lines
First, turn off the water supply. The valves are under your sink. Turn them clockwise to shut off the water. Next, use a wrench to disconnect the water lines from the faucet. Be sure to place a bucket under the lines to catch any water left in the pipes.
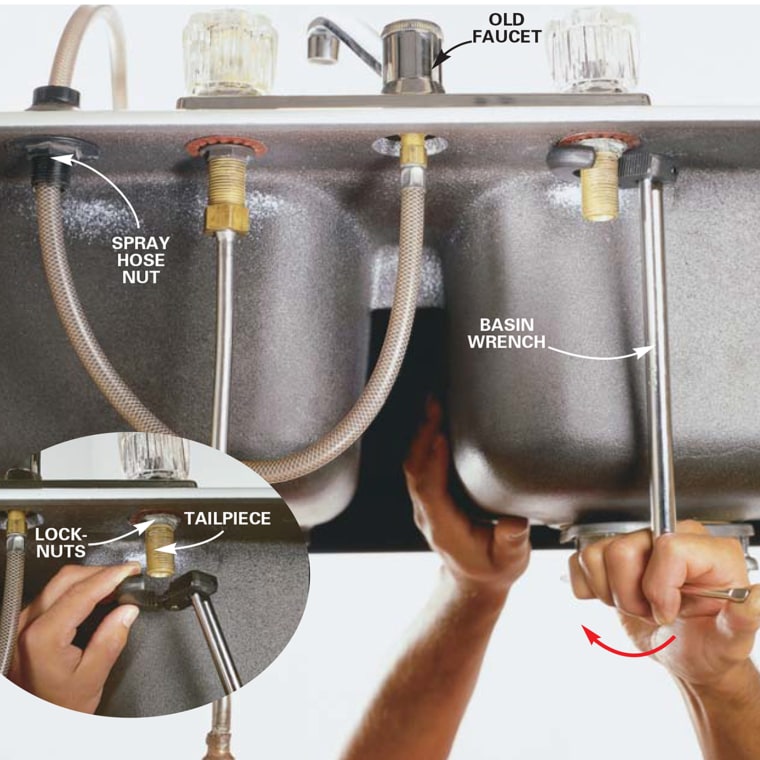
Remove Mounting Nuts
Now, look under the sink and find the mounting nuts. These nuts hold the faucet in place. Use a basin wrench to loosen and remove the mounting nuts. This step can be tricky due to tight spaces, so take your time. Once the nuts are off, lift the old faucet from the top of the sink.

Credit: greenhouseplumbing.com
Clean Sink Area
Before installing a new kitchen faucet, you must clean the sink area. A clean surface ensures a secure and lasting fit for the new faucet. Follow these steps to prepare your sink for a smooth installation process.
Scrape Off Old Caulk
Use a putty knife or razor blade to remove the old caulk. Be gentle to avoid scratching the sink surface. Work around the base of the old faucet and any other caulked areas. Make sure all the old caulk is completely scraped off.
Clean The Surface
After removing the old caulk, clean the sink surface. Use a mild cleaner and a soft cloth to remove any remaining residue. Rinse the area with water and dry it with a clean towel. Ensure the surface is completely dry before proceeding.
Install New Faucet
Replacing a kitchen faucet can seem daunting, but it’s manageable with the proper steps. Installing the new faucet is a crucial part of the process. This section will guide you through positioning the faucet and securing it with mounting nuts.
Position The Faucet
First, carefully insert the new faucet into the designated hole in the sink. Ensure the faucet’s base is flush with the sink surface. Then, check that the faucet is centred and aligned correctly.
Most faucets come with a rubber gasket or a plastic trim ring. Use it to create a watertight seal. If your faucet doesn’t include one, apply a bead of silicone caulk around the base.
Refer to the manufacturer’s instructions for specific positioning details. Different faucets may have unique installation requirements.
Secure With Mounting Nuts
Once positioned, secure the faucet using the mounting nuts. Reach underneath the sink to thread the nuts onto the faucet shanks. Hand-tighten them first to ensure the faucet stays in place.
Use a basin wrench to tighten the nuts further. To prevent damage, avoid overtightening. During this step, check that the faucet remains straight and properly aligned.
Double-check the tightness of the mounting nuts before moving to the next step. A secure faucet is essential to prevent leaks and ensure stability.
Connect Water Lines
Connecting the water lines is a crucial step in replacing a kitchen faucet. This process ensures your new faucet functions correctly without leaks. Follow these steps to connect your water lines properly and enjoy a smooth flow from your new faucet.
Attach Supply Lines
First, attach the supply lines to the faucet. These lines are usually marked hot and cold. Connect the correct line to the corresponding valve. Tighten the connections with a wrench, but avoid overtightening to prevent damage.
Next, attach the other end of the supply lines to the shut-off valves under the sink. Again, use a wrench to secure these connections. Make sure they are snug but not too tight.
Check For Leaks
Turn on the water supply to test for leaks. Open both hot and cold water valves. Let the water run for a few minutes. Then, check all connections for signs of leakage.
If you find leaks, tighten the connections slightly. If the leaks persist, you may need to reattach the supply lines. Ensure each connection is secure and properly aligned.
Test The Faucet
Testing the new kitchen faucet is an essential final step. This ensures everything works correctly and there are no leaks. Follow these simple steps to test your faucet and avoid future problems.
Turn On the Water Supply
First, turn on the water supply valves under the sink. Then, open both the hot and cold water valves fully, allowing water to flow to the faucet. Finally, check for leaks around the connections. If you see any, tighten the connections carefully.
Ensure Proper Function
Next, turn on the faucet handle. Test both hot and cold water. Make sure the water flows smoothly, and does not sputter. Check the water pressure and temperature adjustment. Ensure the faucet swivels easily and reaches all parts of the sink.
Look under the sink to confirm there are no leaks. Wipe any water around the connections to check for continuous drips. If everything works fine, your new faucet is ready for use.
Finishing Touches
Congratulations! You’ve successfully installed your new kitchen faucet. Now, it’s time to add those finishing touches. These final steps will ensure your faucet looks great and functions well. Pay attention to the details to achieve a professional result.
Apply New Caulk
Begin by applying a thin caulk line around the faucet’s base. This helps seal the area and prevents water from seeping underneath. Use a caulk gun for a smooth application, or if you don’t have one, a caulk tube with a precision tip will do.
Press the caulk into place with your finger or a caulk smoothing tool. Wipe away any excess with a damp cloth. Allow the caulk to dry for at least 24 hours before using the faucet. This ensures a strong seal and prevents leaks.
Clean Up Work Area
After the caulk is applied, clean up your work area. Remove any tools, old parts, and debris. Wipe down your countertops and sink to remove any dust or residue. A clean space makes your new faucet look even better.
Check for any stray caulk spots. Use a damp cloth to wipe them away. Ensure everything is dry and tidy. A neat work area shows off your hard work and the beauty of your new faucet.
Credit: www.today.com
Frequently Asked Questions
How Do I Remove An Old Kitchen Faucet?
First, remove an old kitchen faucet, turn off the water supply. Then, disconnect the water lines and mounting nuts. Finally, lift out the old faucet.
What Tools Do I Need To Replace A Kitchen Faucet?
You’ll need a basin wrench, an adjustable wrench, a plumber’s tape, and a bucket. These tools help with removing and installing the faucet.
How Long Does It Take To Replace A Kitchen Faucet?
Replacing a kitchen faucet typically takes one to two hours, depending on your experience and the faucet type.
Can I Replace A Kitchen Faucet Myself?
Yes, you can replace a kitchen faucet yourself. Basic plumbing skills and the right tools are needed.
Tips For Replacing Kitchen Faucets
Replacing a kitchen faucet is a straightforward task. Follow the steps carefully.
- Gather the necessary tools before starting.
- Turn off the water supply. Remove the old faucet. Install the new one.
- Double-check all connections for leaks.
- Tighten everything securely.
- Turn the water back on.
Enjoy your new kitchen faucet. Doing it yourself can save you money and make you feel proud of your handiwork. Your kitchen will look and function better.

